Kickstart Configurator
Kickstart Configurator allows you to create a kickstart file using a graphical user interface, so that you do not have to remember the correct syntax of the file. After choosing the kickstart options, click the Save File button, and a kickstart file is generated.
For a more detailed explanation of kickstart options, refer to the section called Kickstart Options.
To use Kickstart Configurator, you must by running the X Window System. To start Kickstart Configurator, use of the following methods:
On the GNOME desktop, go to the Main Menu Button (on the Panel) => Programs => System => Kickstart Configurator.
On the KDE desktop, go to the Main Menu Button (on the Panel) => Red Hat => System => Kickstart Configurator
Type the command ksconfig at a shell prompt (for example, in an XTerm or GNOME terminal)
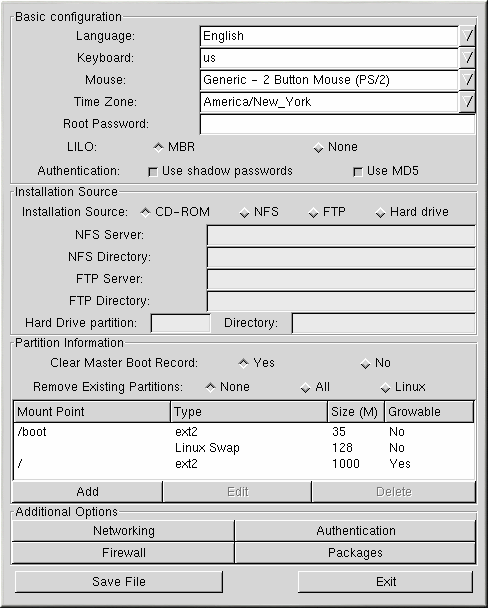
All options in the Basic Configuration section are required. Choose the default language, keyboard, mouse, and time zone. Enter a root password in the Root Password text field to set the root password for the system. Choose whether to install LILO on the master boot record (MBR) or not to install LILO. Next to Authentication choose whether to enable shadow passwords and MD5.
In the Installation Source section, choose either CD-ROM, NFS, FTP, or Hard drive as the installation source. If you choose NFS, enter the NFS server and NFS directory. If you choose FTP, enter the FTP server and FTP directory. If you choose Hard drive, enter the hard drive partition and directory.
In the Partition Information section, choose whether to clear the MBR. You can also choose not to remove the existing partitions, to remove all the existing partitions, or to remove only the existing Linux partitions. Configure your partition table and mount points (this can be compared to Disk Druid or fdisk). By default, a 35 MB /boot directory, a 128 MB swap partition, and a / (root) partition is created. Delete them if you want to configure different partitions. To add additional partitions, click the Add button.
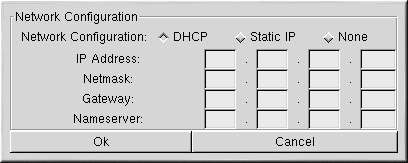
In the Additional Options section, click the Networking button to configure the network settings. Choose DHCP, Static IP, or None as shown in Figure 2-2. If you choose Static IP, enter your IP address, netmask, gateway, and primary nameserver in the given text fields.
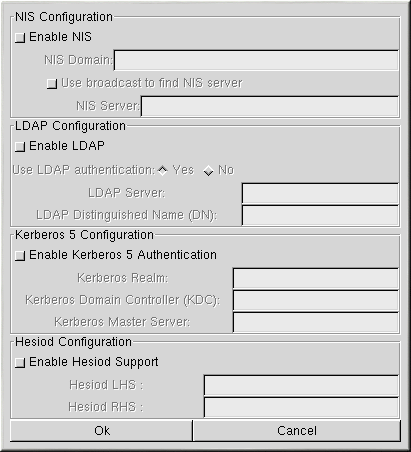
Click the Authentication button to enable NIS, LDAP, Kerberos 5, and Hesiod support. The window in Figure 2-3 will appear.
Click the Firewall button to configure the firewall settings for the system. The firewall window, as shown in Figure 2-4, is identical to the firewall screen that is used during the Red Hat Linux installation program. Refer to the Official Red Hat Linux x86 Installation Guide for further information about configuring the firewall settings.

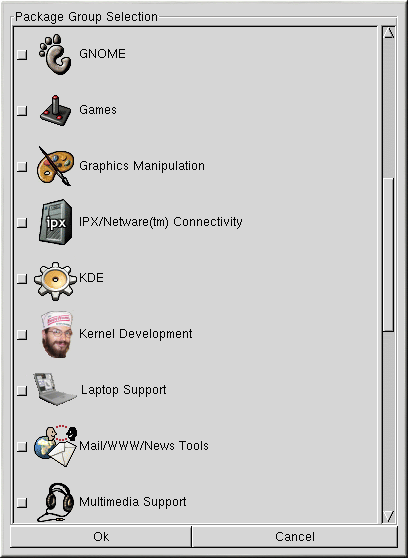
Click the Packages button to configure which packages to install. This section allows you to choose which packages you want to install. These are the same packages groups that are in the Red Hat Linux installation program.
After selecting your kickstart options, click the Save File button to display a file dialog box. Save the file as ks.cfg. Refer to the section called Starting a Kickstart Installation to start the kickstart installation.